
What syncs
- Vendor profiles — trading names, ABNs, addresses, and contact details are created as AP vendors in Premier.
- Banking details — if collected and verified, bank account details are pushed into Premier.
- Compliance records — insurance certificates, licences, and other compliance documents are synced and kept up to date.
- Uploaded documents — files the vendor supplies during onboarding are attached to their Premier record.
Why it matters
- No re-typing — approved vendor details flow directly into Premier, eliminating manual data entry and reducing errors.
- Always current — compliance status updates automatically, so project managers always see the latest information when scheduling work.
- Faster payment setup — accounts payable receives clean, verified records with bank details ready to go.
- Single source of truth — keep your vendor data consistent across TradesField and Premier without spreadsheets or manual syncs.
Approving vendors with Premier
When the Premier integration is connected, approving a submission will prompt you to enter Premier-specific fields before the vendor is synced.Vendor linking
Vendors in TradesField are linked to Premier AP Vendors via the Vendor Code. When you approve a submission:- New vendors — you will be asked to supply the vendor code, company, and purchase category.
- Existing vendors — if the vendor was previously synced to Premier, the vendor code will be pre-filled.
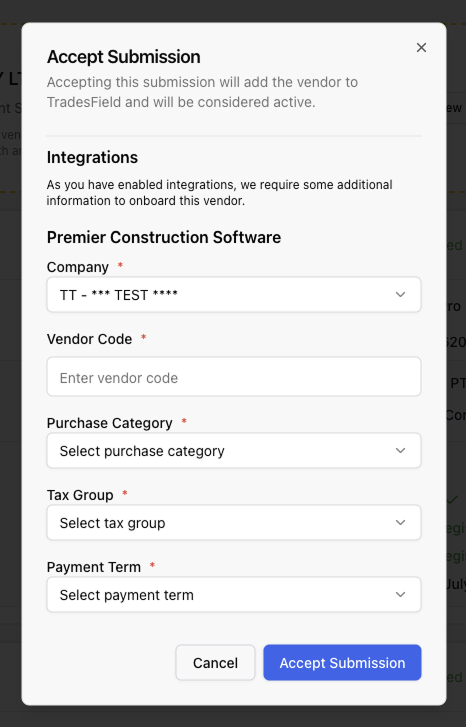
Premier fields
When approving a submission, you will be prompted to provide:- Company — the Premier company to create the vendor in.
- Vendor Code — the unique identifier for the vendor in Premier.
- Purchase Category — the purchase category for this vendor.
- Tax Group — the tax group to assign to the vendor.
- Payment Term — the payment terms for this vendor.
Setting up the integration
Follow these steps to connect TradesField to your Premier environment. You will create a dedicated Premier user for TradesField and enter those credentials in your TradesField tenant.Step 1. Create a new user in Premier
Create a new Premier user with the usernametradesfield. You can use any email address you have access to — this can be your own email or a shared address such as accounts@yourcompany.com.au. You may need to receive login codes during setup.
When TradesField syncs a vendor to Premier, it logs in to this account briefly and logs out straight away. This will consume a licence for that short period.
Step 2. Log in and verify permissions
Once the user has been created:- Log in to Premier with the new credentials.
- Complete any email verification steps Premier requires.
- Confirm the user can access the correct Companies and vendor information.
- Create a test AP vendor to verify the user can create and update vendors.
Step 3. Add the integration in TradesField
- Go to the TradesField Integrations page: https://admin.tradesfield.com/admin/integrations
- Select Add Integration and choose Premier.
- Enter your:
- Premier Client ID
- Premier Username
- Premier Password
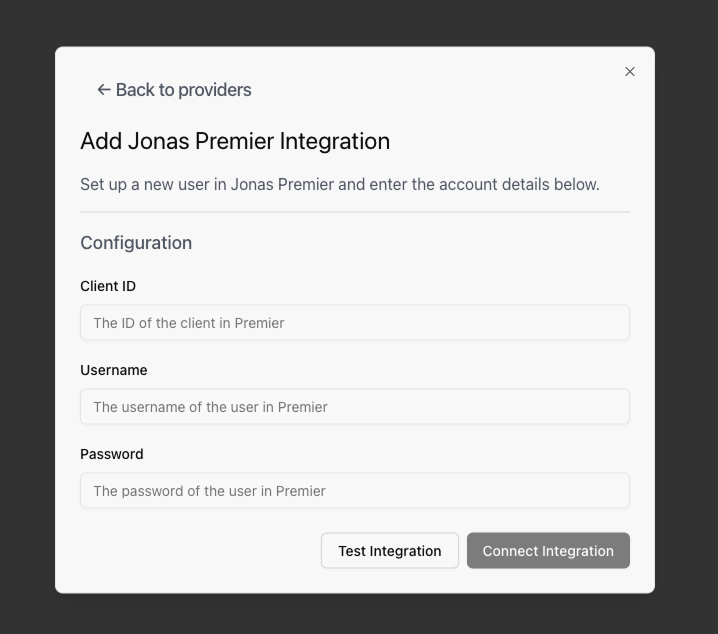
Step 4. Test the integration
Click Test Integration to confirm TradesField can connect using the credentials you supplied.Step 5. Connect the integration
Click Connect Integration to activate the connection. Once connected, TradesField will import key information needed for syncing, including:- Organisation IDs
- Purchase categories
- Other metadata required for vendor creation
Step 6. Complete a test submission
We recommend completing a test vendor submission. Send an onboarding invite to yourself and submit demo information. When you approve the submission, you will see the Premier fields appear, confirming the integration is active and ready to sync.If you prefer, our team can complete a test submission on your behalf. Contact us and we will handle the testing for you.